Paper Marbling Workshops in Anchorage 2026
Paper marbling — the art of floating pigment on a thickened water surface and transferring the resulting pattern to paper — produces results that no other medium replicates. The swirling, flowing patterns emerge from the interaction of pigment, size (the thickened water medium), ox gall (a surfactant that spreads pigment), and the physical manipulation of the surface with combs and styluses, and they’re simultaneously reproducible in their general character and entirely unique in their specific expression. No two marbled sheets are ever identical. The technique has been practiced in Persia, Turkey, and Japan since the 12th century and arrived in European bookbinding and fine paper arts in the 16th century, where it became the standard decorative paper for endpapers and edge treatments in fine bindings. Today, paper marbling workshops in Anchorage teach the technique both as a standalone art form and as a complement to bookbinding and other paper arts practices. This guide covers paper marbling classes in Anchorage in 2026, the materials and methods involved, and how to approach the craft as a continuing practice.
The Science Behind the Patterns
Paper marbling works through the physics of surface tension and density. The size — a thickened water medium — provides a surface on which lighter pigment can float without sinking. Carrageenan (a seaweed extract) is the most common contemporary size medium; methylcellulose and traditional gum tragacanth are alternatives with different handling characteristics.
Pigment drops placed on the size surface spread outward in circles due to surface tension. Ox gall (traditionally dried cattle bile, now available as a synthetic alternative) reduces the surface tension of the pigment, allowing each new color drop to push existing drops outward rather than piling on top of them. The right ratio of ox gall to pigment is the most critical variable in marbling — too little and pigment sinks or clumps; too much and patterns spread uncontrollably.
Once the base pattern of floating pigment is established, the surface is manipulated with combs (rows of evenly spaced pins), styluses (single points), or other tools to create secondary patterns. The physics of the floating pigment mean that pulling a comb through the surface creates predictable, repeatable pattern variations — the stone pattern (unmanipulated circles), the get-gel pattern (back-and-forth comb passes), the feather pattern (comb passes in alternating directions), and the peacock (multiple combs at different spacings) are all produced by specific manipulation sequences.
Materials and Equipment
Paper marbling requires a specific set of materials that aren’t interchangeable with generic art supplies:
- Size (carrageenan): Mixed from carrageenan powder dissolved in water (typically 1–1.5 tablespoons per gallon of water) and allowed to hydrate for several hours or overnight. The size must be at room temperature for best results and lasts several days refrigerated. Pre-mixed liquid carrageenan is available from marbling suppliers if preparing from powder feels daunting for first sessions.
- Marbling paints: Traditional marbling uses acrylic paint thinned with water and ox gall, or purpose-formulated marbling inks (Jacquard Marbling Colors, Lena’s Book Arts marbling inks). The paint must be the right consistency — too thick and it doesn’t float; too thin and it dissipates. Getting this consistency right is one of the most teachable skills in marbling instruction.
- Ox gall or ox gall substitute: The surfactant that allows pigments to spread and coexist on the size surface. Available from art supply and marbling specialty suppliers. A few drops added to each paint color before use; the exact amount varies by color and paint brand.
- Alum-treated paper: Paper must be pre-treated with an alum (potassium aluminum sulfate) solution for the paint to bond permanently rather than washing off. Alum treatment is done before the marbling session, allowed to dry completely. Most papers work — 90 lb watercolor paper, text-weight papers, cardstock — but very heavy-coated papers resist alum absorption.
- Tray: A shallow tray slightly larger than the paper size. Acrylic photo developing trays work well; dedicated marbling trays are available from marbling suppliers.
- Combs and styluses: Purpose-made marbling combs (rows of pins on a frame spanning the tray width) and styluses (toothpicks, bamboo skewers, or proper stylus tools). Combs can be made from nails set in wood strips at regular intervals.
Basic Technique: From First Drop to Finished Sheet
The process follows a reliable sequence that workshop instructors teach in order:
- Prepare the size: Pour carrageenan size into the tray to a depth of about 1.5–2 inches. Skim the surface with a strip of newspaper to remove any bubbles or dust — a clean, bubble-free surface is essential for clean pattern edges.
- Mix paints: Thin each paint color with water and add a small amount of ox gall. Test each color by dropping a single drop onto the size surface — it should spread to a circle 1–2 inches in diameter. Adjust ox gall or water content until this test spread is correct.
- Lay colors: Drop or drip colors onto the size surface in the base pattern. Stone marbling simply drops colors randomly; other patterns start with a specific color arrangement that the comb will manipulate.
- Manipulate the pattern: Draw combs and styluses through the floating paint in the sequence appropriate to the pattern being created. Each manipulation must be done with steady, even speed — hesitating mid-stroke creates visible stop marks in the pattern.
- Transfer to paper: Hold the alum-treated paper by its edges and lay it gently onto the paint surface, center first, lowering the edges to prevent air bubbles. Leave for 30–60 seconds, then lift carefully from one corner, pulling it smoothly across the surface.
- Rinse and dry: Rinse the transferred paint surface under a gentle stream of water to remove size residue. Lay flat to dry on a clean surface or hang to dry with clothespins. The size between the design and the paper washes away, leaving only the bonded paint.
- Clean the tray: Remove remaining paint from the size surface by laying a strip of newspaper across it and lifting. The size can be reused for the next sheet.
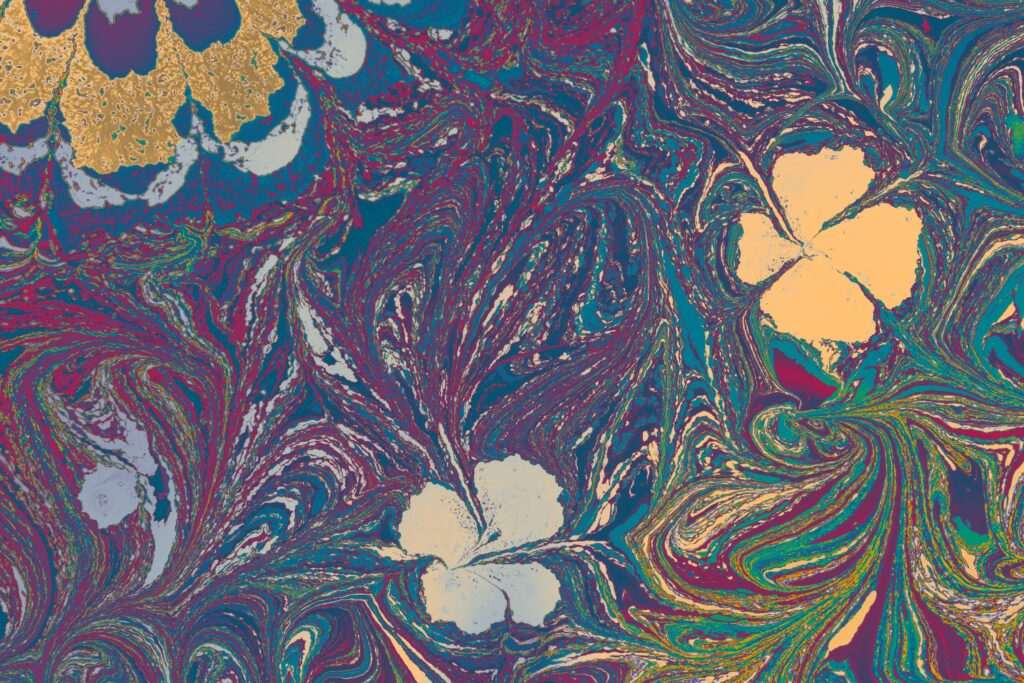
Pattern Variations
The range of distinct marbling patterns is larger than most beginners expect — each requires a specific sequence of color application and tool manipulation:
- Stone: Unmanipulated drops of color creating overlapping circles. The foundational pattern; teaches color spread and ox gall calibration without tool complexity.
- Nonpareil: Stone pattern combed in parallel rows across the surface. One of the most recognizable marbling patterns — the basis for most traditional book endpaper marbling.
- Spanish (Get-Gel): Nonpareil combed in a back-and-forth zigzag, creating the wave-like pattern associated with classic Italian and Spanish marbling.
- Feather: The Spanish pattern combed at right angles in alternating left-right passes, creating the distinctive feather or herringbone pattern.
- Peacock: Multiple combing passes with different spacing combs, creating the dense, layered pattern associated with Persian marbling (Ebru).
- Free-form (Suminagashi): Japanese water marbling using sumi ink and brush pens, blown across the surface with gentle breath to create organic, flowing patterns. Technically simpler than size-based marbling but produces a distinctly different aesthetic.
Paper Marbling Workshops in Anchorage
Paper marbling workshops appear regularly in Anchorage’s craft studio circuit, often alongside bookbinding and printmaking offerings since all three connect to the broader paper arts tradition. Workshop sessions typically run 2.5–3 hours and produce 4–6 finished marbled sheets per participant — enough to experiment with multiple patterns and color palettes. Materials (size, paints, alum solution, paper) are provided; participants leave with their finished sheets and usually a small amount of marbling paint to experiment with at home.
Prices run $45–$80, with the higher end for sessions that use premium papers or provide larger sheet sizes. The Alaska Print Makers and Book Arts community surfaces paper marbling workshops through its social media and event calendar — this is the most reliable source for current workshop offerings in Anchorage. The Anchorage Museum also periodically presents paper arts and bookbinding demonstrations as part of its community programming calendar. Individual sessions sometimes appear at venues like the Anchorage Market & Festival at Town Square Park as demonstration and workshop events during the summer market season.
Continuing at Home
Paper marbling is achievable at home with modest investment — a marbling starter kit from a dedicated supplier (Marbling Arts, Talas, or similar) typically costs $40–$80 and includes carrageenan, marbling paints, ox gall, and basic instructions. A dedicated tray (the investment that most constrains home marbling) can be a standard photo developing tray or a purpose-cut acrylic sheet. The most common challenge for home marblers is maintaining the size temperature consistently — working in a warm room (above 65°F) prevents the carrageenan from thickening unevenly. Our free things to do in Anchorage guide covers the art supply resources and community paper arts events most relevant to continuing a marbling practice in Anchorage. Our Anchorage hiking guide covers the outdoor environments — including the Tony Knowles Coastal Trail, whose Cook Inlet views and tidal flats offer the fluid, flowing forms that inspire marbling’s organic pattern vocabulary — where Alaska’s natural color palette is most directly experienced.

No comments yet.