Block Printing Classes and Workshops in Anchorage: Linocut, Rubber, and Fabric Printing
Block printing is one of the oldest reproduction technologies in human history — the woodblock printing traditions of East Asia produced some of the earliest mass-reproduced images and texts — and it remains one of the most direct and satisfying ways to put a repeated image on paper or fabric. The process is straightforward: carve a design into a flat block of material, ink the surface, press it against the substrate, and lift to reveal the printed design. The relief print — where the carved-away areas hold no ink and print as the color of the substrate, while the uncarved raised areas hold ink and print — is both technically simple and visually powerful, producing images with a graphic character that’s distinctly different from photography or digital print. Anchorage’s printmaking community has found a consistent audience for block printing instruction, and the craft’s ability to produce repeating patterns makes it particularly appealing for fabric printing, wrapping paper, and handmade stationery with Alaska-specific designs. This guide covers block types, carving tools, inking and printing technique, registration for repeating patterns, and fabric vs. paper printing in 2026.
Block Types: Linoleum, Rubber, and Wood
Three main block materials are used in contemporary block printing, each with different carving properties, durability, and surface quality:
Linoleum (Linocut)
Linoleum — the same material historically used in floor covering — is the standard block printing medium for serious printmaking. Traditional grey or brown linoleum (battleship linoleum) has a firm, consistent surface that holds fine detail well and produces clean-edged prints over many impressions. It carves more smoothly and cleanly than rubber; the surface resists tearing at fine detail points; and the prints produced have a slightly textured surface quality from the linoleum’s fiber structure that many printmakers prefer to the uniformity of rubber.
Softer “safety” linoleum (also called carving linoleum or EZ-cut linoleum) is a modernized version with a more pliable, easier-cutting surface — excellent for beginners and for detail work, though slightly less durable over long print runs than traditional lino. Speedball’s Speedy-Carve and Blick’s Art Lino are widely used examples.
Rubber Blocks
Soft rubber carving blocks are the most beginner-friendly block printing material — they carve with very little resistance and are forgiving of uneven pressure during carving. The trade-off is less crisp detail edge quality in the print and lower durability over long runs. Rubber blocks are ideal for beginner workshops and quick projects; serious printmakers often move to linoleum for better results as their skills develop.
Woodblock
Traditional East Asian and European woodblock printing uses actual wood — typically a smooth, fine-grained hardwood like cherry, pear, or boxwood — which produces the hardest, most durable blocks capable of thousands of consistent impressions. Wood requires more carving skill and tool quality than linoleum or rubber; the grain direction affects carving direction (cross-grain cuts require different technique than with-grain cuts). Plank-grain wood (cut along the length of the log) is used for most relief printing; end-grain wood (cut across the log) allows carving in any direction but is typically used for highly detailed engraving-style work. Wood block work is a more advanced technique taught in dedicated printmaking programs rather than introductory workshops.
Carving Tools and Techniques
Block printing carving tools are specialized gouges designed to remove material efficiently from linoleum or rubber:
- V-gouge: A V-shaped cutter that produces clean, fine lines and is used for outlining designs and carving thin detail lines. The primary tool for most design work — the width of the V determines the line width produced.
- U-gouge: A U-shaped cutter that removes larger areas of material efficiently. Wider U-gouges clear open background areas; narrower U-gouges create texture and medium-weight carved areas.
- Straight chisel: Used for cleaning up edges and removing large flat areas cleanly.
- Multi-tool sets: Speedball, Pfeil, and Flexcut make handle-and-interchangeable-blade sets common in workshop settings. Beginners typically work with a 5-blade set (small V, large V, small U, large U, straight chisel) that covers most carving needs.
The fundamental carving technique: carve away from the hands (never toward), keep tools sharp, and carve in the direction the material cuts most easily (with the grain in wood; linoleum and rubber are less directional). The carved-away areas print as the substrate color (white on white paper, the fabric color on fabric). Beginners often underestimate how much material needs to be removed — leaving too many fine slivers between carved areas produces muddy prints where the thin ridges collapse under printing pressure and pick up ink. Bold designs with clearly defined raised and carved areas print more cleanly than overly fine detailed work.
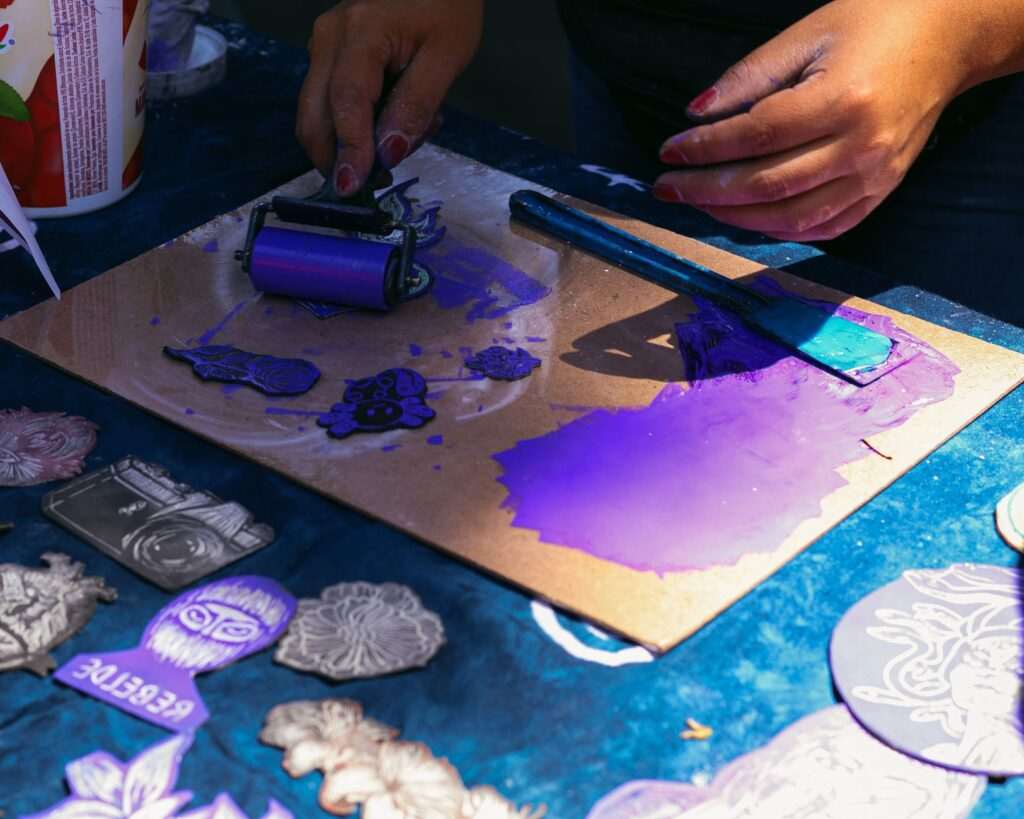
Inking and Printing
Ink application and printing pressure are the process variables that determine print quality:
Ink types: Water-based block printing inks (Speedball, Akua, Gamblin) clean up easily and are suitable for most paper printing. Oil-based inks produce richer color and a slightly different surface sheen; they require mineral spirits for cleanup. Fabric printing requires fabric-specific inks or paints (Speedball Fabric Block Printing Ink, Jacquard Textile Color) that bond to fiber and withstand washing.
Ink application: Ink is rolled onto the block surface using a brayer (a hard rubber roller) rather than applied by brush. A thin, even layer of ink — enough to cover the raised surfaces uniformly without flooding into the carved valleys — produces the cleanest prints. Too much ink causes bleeding at the print edges; too little ink produces incomplete coverage. Rolling ink out on a glass plate or acrylic sheet to an even, slightly tacky consistency before rolling onto the block is the standard approach.
Printing: The inked block is pressed against the substrate either by hand pressure (burnishing the back of the paper against the block with a wooden spoon, a baren, or your palm) or by running the block and paper through a printing press. Even, consistent pressure across the entire block surface produces even prints; uneven pressure creates light and dark areas within the print.
Registration for Repeat Patterns
Repeat patterns — where the same block is printed multiple times across a surface in a regular arrangement — require registration: a system for positioning the block consistently for each impression. Simple registration uses pencil marks on the substrate and tape stops on the work surface to position the block in the same location each time. More precise systems use registration jigs (L-shaped corner guides or registration boards) that hold the block and paper in exact relationship for every print. Accurate registration is the difference between a professional-looking repeating pattern and one that looks misaligned.
Fabric vs. Paper Printing
Block printing on fabric requires different ink, preparation, and finishing than paper printing:
Fabric preparation: Fabric should be pre-washed to remove sizing that interferes with ink adhesion, then ironed smooth and taped or pinned flat on a firm padded surface (a piece of felt or batting under the fabric helps absorb printing pressure).
Ink heat setting: Fabric block printing inks typically require heat setting after drying — pressing with a hot iron or running through a dryer — to bond the ink permanently to the fiber. Without heat setting, the color washes out. Instructions vary by brand; following manufacturer specifications for heat setting time and temperature is essential for wash-fast results.
Natural vs. synthetic fiber: Natural fibers (cotton, linen, silk) take block printing ink more readily and completely than synthetic blends. 100% cotton fabric produces the most reliable results for beginner fabric printing projects.
Block Printing Workshops in Anchorage
Anchorage block printing workshops range from 2-hour introductory sessions (producing a small print edition on paper) to half-day fabric printing workshops where participants print a tea towel, tote bag, or napkin set. Alaska-specific design motifs — wildlife silhouettes, wildflower patterns, geometric tundra abstractions — appear consistently in Anchorage workshop curricula and are particularly effective in the bold, graphic aesthetic that block printing produces most naturally.
Workshop prices run $40–$80, with block, carving tools, ink, and substrate included. A basic home block printing kit (linoleum block, 5-blade carving set, brayer, ink, and paper) costs $40–$65 and produces many practice and project sessions. Anchorage craft workshop participants can show and sell their finished work at year-round events including the Anchorage Market & Festival, the Anchorage Native Arts & Culture Festival, and the Alaska State Fair. Our free things to do in Anchorage guide covers the art markets and community printmaking events where Anchorage block printers exhibit and sell their work. Our Anchorage hiking guide covers the landscapes and natural imagery — coastal silhouettes, boreal forest patterns, wildlife forms — that translate most powerfully into the bold, graphic vocabulary of block printing.
Photo by sury Onaly on Pexels.


No comments yet.