Linocut Printmaking in Anchorage: Carving, Reduction Technique, and Editioning (2026)
Linocut printmaking — carving a design into linoleum and pressing inked relief surfaces onto paper or fabric — is one of the most direct, satisfying, and widely accessible forms of printmaking available. Unlike etching or screenprinting, linocut requires no acid, no photo chemicals, no darkroom, and no expensive press (though a press produces better results than hand-burnishing). The tools are simple, the process is visible and intuitive, and a beginning printmaker can produce a compelling finished print in a first session. Linocut has a serious art history: German Expressionist artists embraced it in the early 20th century for its bold, graphic qualities; Pablo Picasso developed the reduction linocut technique that remains the most sophisticated approach to multicolor linocut work; and contemporary printmakers use linocut alongside digital design for everything from fine art editions to commercial illustration. Anchorage linocut workshops offer both the technical depth of a serious printmaking practice and the immediacy of results that makes the medium rewarding for beginners. This guide covers linoleum types, carving tools, reduction technique, inking, editioning, and beginner projects for 2026.
Linoleum Types
Not all linoleum carves the same, and the material you choose significantly affects how your tools behave and what level of detail you can achieve:
Traditional Grey or Battleship Linoleum
The original printmaking linoleum — a dense, slightly chalky material with a jute backing, sometimes called “battleship grey” for its characteristic color. Traditional linoleum carves cleanly with good control, holds fine detail, and produces the sharpest printed edges of any carving material. It also requires the most effort to carve: the material is harder and more resistant than newer alternatives, and working large areas can be tiring. Traditional linoleum is the preferred material for serious printmaking work — its density produces the crispest results when properly carved and printed.
Soft-Cut (Easy Cut) Material
Softer, more pliable carving blocks sold under names like “Speedy-Carve,” “Easy Cut,” or “Soft Kut” — rubbery polymer materials that carve with far less effort than traditional lino. Soft-cut blocks are ideal for beginners and for intricate detail work where carving resistance would cause the tool to slip and damage the design. The tradeoff is that edges tend to be slightly softer than traditional lino prints, and the material doesn’t hold as well under heavy press pressure or large print runs. For hand-printing and small editions, soft-cut is excellent.
Japanese Vinyl and New Wave Materials
Newer vinyl-based carving materials offer intermediate qualities between traditional lino and soft-cut — harder than rubber but easier than traditional lino, with consistent texture. These materials have become popular in workshop settings because they cut predictably for beginners while still producing sharp printed edges. Golden Artist Colors’ “Vinyl Erasers” cut cleanly for very small, detailed designs, though they’re limited in size for larger compositions.
Carving Tools
The quality of carving tools determines the precision and range of marks available in a linocut:
- V-gouge: A V-shaped blade that cuts a narrow channel — the primary tool for detail lines, fine hatching, and defining design edges. Available in several widths (1mm for fine detail through 5mm for broader lines). The V-gouge is the workhorse of linocut carving.
- U-gouge: A U-shaped (or sometimes called semicircular) blade for clearing larger areas cleanly. Wider U-gouges (6–12mm) remove background material efficiently without the tearing that a V-gouge causes in wide cuts. Shallower U-gouges (sometimes called veining tools) create softer, curved marks.
- Straight blade / skew chisel: A flat or angled blade for very precise line cutting and for cleaning up corners. Less common but useful for architectural or geometric designs where V-gouges produce too rounded a cut.
- Tool sets: Beginner sets (Speedball is the most common brand) include interchangeable blades in a single handle — cost-effective and adequate for learning. Dedicated handles with fixed blades (Pfeil, Flexcut) offer better control and sharper results for more serious work. Sharp tools are essential in linocut: a dull blade skips, tears, and causes hand fatigue, while a sharp blade cuts cleanly with less effort.
Reduction Linocut: The Multicolor Technique
The reduction linocut, developed extensively by Picasso in the late 1950s, produces multicolor prints from a single block. The approach requires planning in advance and commits the printmaker to a specific sequence — it’s a “destructive” process from which there’s no return:
- Print the first color: Start with the lightest color (usually yellow or a light value). Print the entire edition on the block before carving further. These are your starting prints — print more than your intended edition size to allow for failures later.
- Carve away what should remain the first color: Areas that should stay the first color in the finished print are now carved away permanently — they’ll print nothing from this point forward. Only the areas intended to receive the second color remain.
- Print the second color: Re-ink the now-reduced block in the second color and print onto the same sheets. The first color, now exposed under the second pass, shows through in the carved-away areas.
- Repeat until complete: Continue carving and printing until the darkest color (usually the last pass) unifies the composition. The final print shows all the layered colors where the block was carved progressively thinner.
Reduction linocut requires exact registration — each successive color pass must align precisely with the previous ones. Registration systems range from simple corner tabs taped to a baseboard to dedicated printing jigs that ensure repeat accuracy.
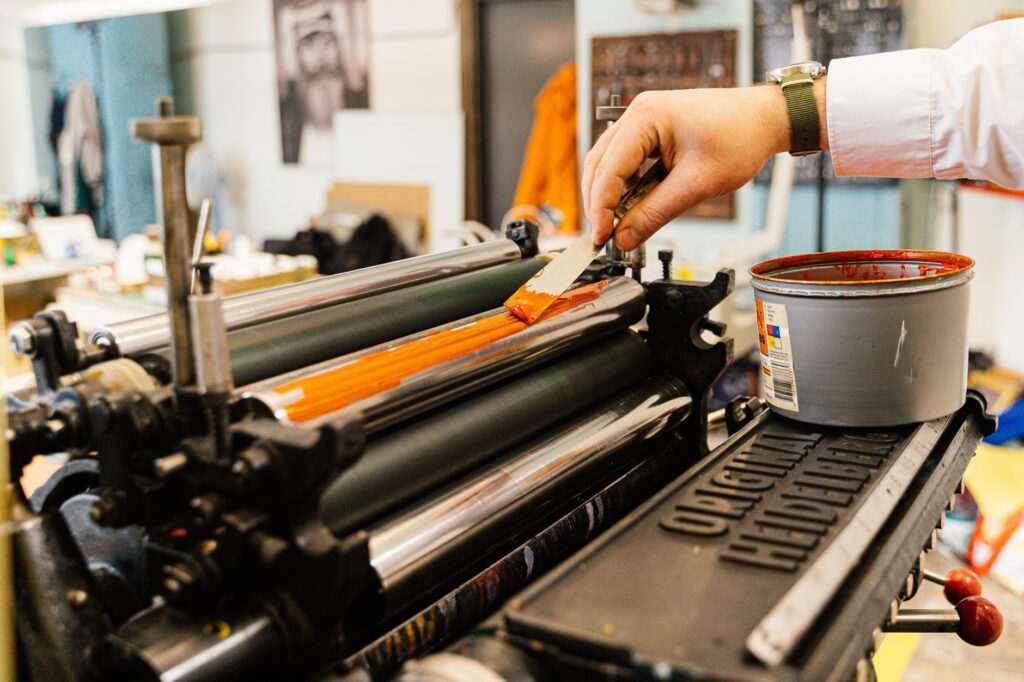
Inking and the Brayer
A brayer — a small rubber roller with a handle — is the standard tool for applying ink to a linocut block evenly:
Water-based block printing inks (Speedball, Daniel Smith) work for hand-printing and fabric printing; oil-based inks produce richer, denser results for paper printing and handle press printing better. The consistency of ink on the block matters enormously: too much ink fills in the carved areas; too little ink produces pale, patchy prints. Roll the brayer out on a glass or acrylic inking slab until the ink coat is even (it should sound tacky, not wet) before rolling onto the block. Apply moderate, even pressure in both directions to coat the block surface uniformly without pushing ink into the carving grooves.
Hand-burnishing (rubbing the paper over the inked block with the back of a spoon, a wooden baren, or a dedicated burnishing tool) works well for small blocks and soft materials. A tabletop etching press produces more consistent pressure and is worth the investment for anyone pursuing linocut seriously — consistent pressure produces consistent editions.
Editioning and Signing Prints
Fine art printmaking editions follow established conventions that give each print in an edition both value and documentation:
- Edition number: Written as a fraction (e.g., “3/20”) in the lower left of the print — this one is the third print in an edition of twenty.
- Title: Written in the lower center, in pencil.
- Signature: The artist’s signature in pencil in the lower right.
- Artist’s Proofs (A/P): A small number of prints outside the main edition, pulled for the artist’s records. Typically limited to 10% of the edition size.
- Destruction of the block: For a strictly limited edition, the block is destroyed or defaced after printing to guarantee no additional prints can be made.
Beginner Project Ideas
- Single-color botanical print: A plant leaf or flower head traced or drawn directly onto soft-cut material, carved, and printed in a single ink color on a light paper. An excellent first project that produces a genuinely appealing result.
- Two-color geometric reduction: A simple geometric pattern (interlocking triangles, concentric circles) practiced as a two-color reduction. The simplicity makes registration errors less damaging while introducing the core technique.
- Alaska wildlife silhouette: A raven, bear, salmon, or moose silhouette — high-contrast subject matter that suits linocut’s graphic qualities naturally and produces Alaska-specific work with immediate regional character.
Linocut Workshops in Anchorage
Anchorage linocut workshops typically run 3–4 hours for a single-color beginner session (carving and printing a simple design), with multi-session formats for reduction linocut that require the commitment of a multi-week project. Workshop prices run $45–$90, with tools and materials provided. A home linocut starter kit (a small Speedball beginner set with carving tool, soft-cut block, ink, and brayer) costs $25–$45 and is widely available at craft stores. Anchorage craft workshop participants can show and sell their finished work at year-round events including the Anchorage Market & Festival, the Anchorage Native Arts & Culture Festival, and the Alaska State Fair. Our free things to do in Anchorage guide covers the galleries and art spaces where Anchorage printmakers exhibit and sell their linocut and relief print work. Our Anchorage hiking guide covers the natural environments — forests, wildlife, mountain horizons — that provide the richest Alaska-specific subject matter for linocut design.
Photo by AI25.Studio Studio on Pexels.


No comments yet.