Pyrography Workshops in Anchorage: Woodburning Tools, Alaska Birch, and Shading Technique (2026)
Pyrography — burning designs into wood, leather, or gourds with a heated tip — is one of the most tactilely satisfying of all handcraft disciplines. The marks aren’t applied to the surface; they become part of it, fused into the material in a way that’s genuinely permanent. Alaska’s wood culture gives pyrography a local dimension that few other regions can match: birch and alder, two of the most common trees in Southcentral Alaska’s boreal forest, burn with qualities that have made them favorites of pyrographers far beyond the state. Alaska’s wildlife imagery, Indigenous art forms, and landscape shapes translate particularly well into pyrography’s tonal language of burned and unburned wood. This guide covers pyrography equipment, wood selection, design transfer, surface options, finishing, safety, and woodburning classes in Anchorage in 2026.
Solid-Tip vs Wire-Nib Burners
The single most significant equipment decision in pyrography is the choice between a solid-tip burner and a wire-nib unit:
Solid-Tip Burners (Walnut Hollow and Similar)
Solid-tip burners are the standard entry-level tool — a fixed metal tip screwed into a handle, heated to a single temperature by a simple dial. Walnut Hollow’s Creative Versa-Tool ($25–$35) is the most widely sold model and comes with multiple interchangeable tip shapes. The limitation is thermal lag: solid tips heat slowly (taking minutes to reach operating temperature) and cool slowly (taking minutes to cool after a temperature adjustment). This lag makes precise, varied-tone work difficult because the tip can’t change temperature responsively mid-stroke. Solid-tip burners work well for simple, single-tone burn work and are appropriate for beginners exploring whether pyrography suits their practice before investing in a variable-temperature unit.
Wire-Nib Burners (Colwood, Razertip, Burnmaster)
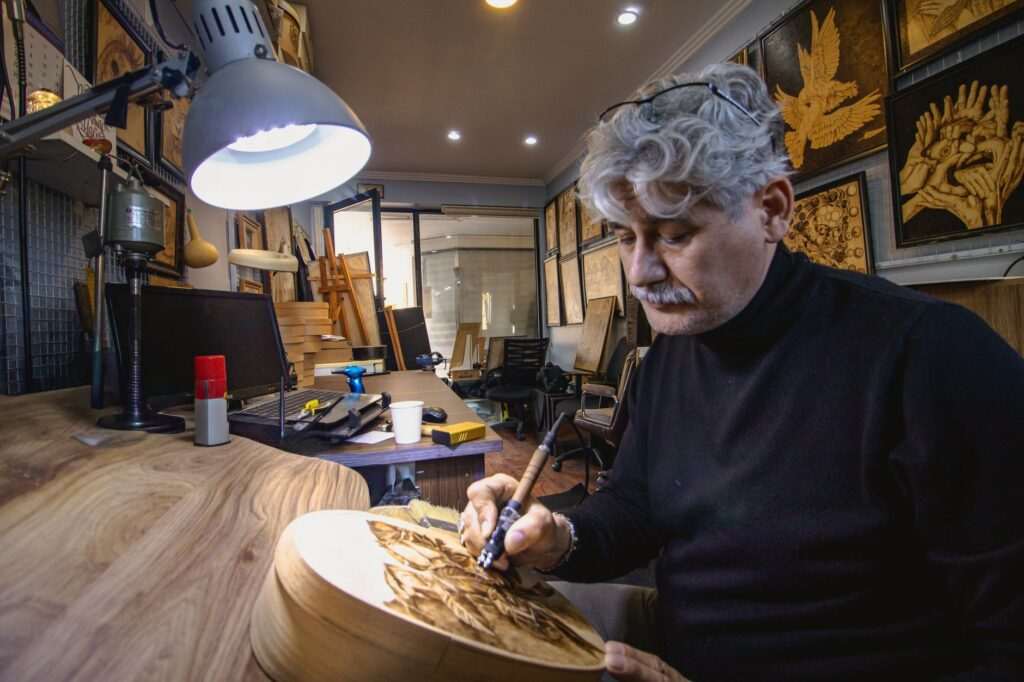
Professional-grade wire-nib burners use thin wire nibs that heat and cool almost instantaneously, allowing temperature to be adjusted mid-stroke and giving the pyrographer much finer control over tone variation. The wire nib’s small thermal mass means it responds immediately to temperature dial changes — moving from a light tan to a deep brown in seconds. Colwood Electronics ($120–$250 for the unit), Razertip ($100–$200), and Burnmaster ($150–$300) are the three main professional brands, each offering multiple interchangeable nib shapes for different line weights and shading patterns. Wire-nib units are the tool for anyone serious about pyrography work: the tonal range, line precision, and control they allow are genuinely not achievable with solid-tip burners.
Nib types matter as much as the unit itself. A shader nib covers broad areas with even tone; a writing nib draws thin, precise lines; a ball tip creates texture and stippling effects; a spoon shader produces the smooth, gradual gradients used in portrait and wildlife work. Most professionals own ten or more nib shapes and swap them throughout a piece.
Wood Selection
Surface choice is as important in pyrography as tool choice — different woods burn with dramatically different characteristics:
Basswood
The most popular pyrography surface for American woodburners: fine-grained, consistent, pale, and even-burning. Basswood’s tight, regular grain doesn’t vary significantly between early wood and late wood growth rings, which means the tip burns at the same temperature across the entire surface without the uneven resistance that wider-grained woods produce. Basswood panels, plaques, and spoons are available at most craft stores at low cost. It’s the standard beginner and intermediate surface.
Birch (Alaska Context)
Alaska birch (Betula neoalaskana) produces a pale, fine-grained wood with minimal figure variation that burns almost as evenly as basswood with warm honey-to-chocolate tonal range. Baltic birch plywood (with its sanded, consistent face) is the practical Alaska equivalent — available at Anchorage hardware stores and woodworking suppliers, it provides a large format at low cost. Birch rounds (cross-sections of birch logs, sanded smooth) appear regularly at Alaska craft markets and make compelling natural-edge substrates for wildlife pyrography.
Poplar and Cherry
Poplar burns well with a slightly greenish-grey undertone that differs from basswood and birch’s warm browns. Cherry produces a rich, warm brown when burned against its naturally reddish-tan surface — it’s a beautiful combination but considerably more expensive than basswood or birch. Both reward the pyrographer who’s moved beyond introductory work and wants to explore different tonal palettes.
Woods to Avoid
Pine, spruce, and other resinous softwoods burn unevenly because the resin content pockets throughout the grain, producing blotchy, unpredictable marks and releasing acrid fumes. MDF and plywood with laminated or veneered faces release formaldehyde and adhesive fumes when burned — these materials should never be used in pyrography. Aromatic woods (cedar, eucalyptus) produce toxic smoke at pyrography temperatures. Stick to hardwoods with known safe burning profiles.
Design Transfer Methods
Transferring a design onto the wood surface before burning ranks among the most practical foundational skills a pyrographer develops:
- Graphite transfer paper: Place graphite paper (not carbon paper — the wax in carbon paper resists the burn) between the printed or drawn design and the wood surface, tape it in position, and trace the design lines. The graphite transfers to the wood and shows clearly before burning. It’s the most controllable transfer method for complex designs.
- Light box tracing: Place the wood over a light box and trace the backlit design directly onto the wood surface with a soft pencil. Works well for thin wood panels and veneer; not practical for thick slabs where the light can’t penetrate.
- Direct printed transfer: Laser-print the design in reverse, place it face-down on the wood, and apply acetone (nail polish remover) to the back of the paper with a cotton ball. The toner transfers to the wood surface. Variable results depending on paper type and laser toner formulation — test before relying on it for a finished piece.
- Freehand drawing: Sketch the design directly onto the wood with a soft pencil. Works for experienced pyrographers with strong drawing skills; any pencil marks that don’t burn away can be erased lightly after burning.
Shading: Temperature, Speed, and Pressure
Pyrography tonal control comes from three variables managed simultaneously: tip temperature, movement speed, and pressure. Higher temperature at the same speed produces darker burns. Faster movement at the same temperature produces lighter marks. Heavier pressure drives the tip deeper into the grain for denser marks. The relationship between these three variables is what the pyrographer learns to control intuitively over time — similar to the way a watercolorist learns water-to-pigment ratios by feel rather than measurement.
For smooth gradients (the kind needed in portrait work and wildlife shading), the key technique is circular or oval tip movement at consistent speed while gradually increasing temperature from light to dark. This blends burns into each other without visible stroke marks. Straight-line movement at the same temperature produces visible parallel lines — effective for texture but not for smooth skin or fur transitions.
Burning Leather and Gourds
Pyrography extends beyond wood to leather and dried gourds, each with specific requirements:
Leather pyrography requires vegetable-tanned leather exclusively — chrome-tanned leather (the most common commercial leather) releases toxic chromium compounds when burned and must never be used. Vegetable-tanned leather (available from leathercraft suppliers) burns at lower temperatures than wood and produces fine, detailed work; the tonal range runs from light tan to deep, rich brown. Leather bags, belts, journal covers, and cuffs are the most common substrates. Use lower tip temperatures than for wood — leather scorches quickly and over-burning is harder to recover from than on wood.
Gourd pyrography uses dried, hard-shelled gourds (Lagenaria species) as a natural round substrate. The gourd shell burns similarly to a light hardwood, with a warm brown tone on a creamy tan background. Gourds must be fully dried and cured before burning (green gourds have too much moisture content); properly dried gourds are rigid and hollow. Gourd pyrography is often combined with carving, painting, and staining to produce highly decorated finished pieces. Alaskan gourd artists sometimes incorporate totem imagery and wildlife motifs into gourd work with striking results.
Finishing and Sealing
A completed pyrography piece needs sealing to protect the burned surface and enhance the tonal contrast:
- Lacquer: Produces a hard, clear, glossy finish that intensifies the depth of dark burns against light wood. Spray lacquer (Deft, Krylon) applies quickly and evenly; brush-on lacquer gives more control over coat thickness. Multiple thin coats with light sanding between produce the best results.
- Polyurethane: More durable than lacquer for pieces that’ll be handled frequently (bowls, spoons, handled objects). Slightly amber-tinted, which warms the wood tone. Oil-based polyurethane produces a harder film than water-based; water-based polyurethane dries faster with less odor.
- Tung oil / Danish oil: Penetrating finishes (rather than surface films) that soak into the wood and produce a low-sheen, natural look. They enhance the warm tones of birch and basswood without the plastic appearance of lacquer or poly. Best for flat pieces displayed on walls rather than functional objects that’ll be washed.
- Renaissance Wax / paste wax: A final wax coat over lacquer or polyurethane adds a soft sheen and tactile warmth. Particularly effective on pieces that combine pyrography with carved areas, where the wax highlights the texture contrast.
Ventilation and Safety
Pyrography produces smoke — and that smoke contains combustion byproducts from whatever material is burning. Safe pyrography practice requires taking ventilation seriously:
A dedicated smoke extractor positioned close to the burning area captures combustion byproducts before they enter the room air. Craft smoke extractors (Purex, UAS) use activated carbon filters designed for soldering and pyrography fumes. At minimum, work next to an open window with a fan drawing air away from the workspace. A respirator rated for organic vapor (an N95 filters particulates but not gases — an OV/P100 combination respirator handles both) should be worn when working for extended periods.
Never burn MDF, plywood with adhesive cores, pressure-treated wood, painted wood, chrome-tanned leather, or plastic materials at any temperature. These release genuinely hazardous compounds — formaldehyde, heavy metals, cyanide compounds — that aren’t adequately addressed by room ventilation alone. Stick to verified safe materials, and if in doubt, don’t burn it.
Pyrography Workshops in Anchorage
Anchorage pyrography workshops typically run 2–3 hours and provide pre-sanded birch panels or rounds as the substrate. Most workshops walk participants through a simple shading exercise (practicing gradient control before free design work) and then allow participants to burn an original design or guided pattern on a second piece. Wire-nib units are increasingly provided at better-equipped workshops; ask about equipment type when booking if the burner quality matters to you.
Workshop prices run $40–$75 depending on session length and substrate complexity. Private group sessions (for team events and small parties) run higher and typically allow more time on the equipment. For visitors wanting to continue the practice, entry-level wire-nib units (Razertip or Colwood) ship to Alaska; birch rounds appear regularly at Anchorage craft markets and from Alaska woodworkers. Anchorage craft workshop participants can show and sell their finished work at year-round events including the Anchorage Market & Festival, the Anchorage Native Arts & Culture Festival, and the Alaska State Fair. Our free things to do in Anchorage guide covers the craft markets and community events where pyrography work and supplies are most visible in the city. Our Anchorage hiking guide covers the boreal forest trails where Alaska’s birch and alder grow — the same species that end up on pyrography workshop tables.
Photo by Zeynep Kahraman on Pexels.
No comments yet.