Alaska Aurora Photography 2026: Camera Settings, Locations & Forecasting Apps
Photographing the aurora borealis is the difference between a smartphone snapshot that looks like a smear of green and an image that makes people ask what camera you used. The northern lights are among the most technically demanding subjects in photography: they move, they vary wildly in brightness, and they occur in near or total darkness at temperatures that drain batteries and stiffen fingers. Alaska — with dark skies from late August through April, frequent strong solar events, and landscapes that provide genuinely extraordinary foreground — is one of the best places in the world to learn and practice aurora photography. This guide covers everything you need to capture the lights from the dark sky locations accessible from Anchorage.
Camera Settings: The Foundation
Aurora photography requires manual mode. The camera’s auto-exposure system cannot interpret a dark sky correctly and will either underexpose the aurora or create unacceptable motion blur. Set these parameters as your starting point and adjust based on what you see on the screen:
- Mode: Full manual (M)
- ISO: Start at 1600 for a moderate display; drop to 800 for very bright aurora, raise to 3200 for faint or diffuse displays. Above ISO 3200 on most cameras, noise becomes a significant problem.
- Aperture: f/2.8 or wider if your lens allows. Aurora photography is one of the few situations where you want maximum aperture — you need every photon you can capture. f/1.8 or f/2.0 is better than f/2.8; f/4 is workable but limiting.
- Shutter speed: 5 to 15 seconds. For a slow-moving, diffuse display, 15 seconds works well. For fast-moving curtains and pillars, drop to 5 or 8 seconds to preserve the structure rather than blurring it into a flat glow. The “500 rule” (500 ÷ focal length = maximum seconds before stars trail) limits your shutter on wide lenses at longer exposures.
- Focus: Manual focus set to infinity. In darkness, autofocus will hunt uselessly; switch to manual and set the focus ring to the infinity mark (∞), then fine-tune by checking a bright star on your rear screen zoomed in to 10x.
- Format: RAW, not JPEG. RAW files preserve the full tonal range and allow white balance and exposure adjustments in post that JPEGs cannot recover. This is non-negotiable for serious aurora work.
- White balance: Set to auto or a fixed color temperature (3500–4500K) — white balance is adjustable in RAW post-processing, so it matters less at capture than other settings.
Lenses: Wide Is Everything
A wide-angle lens is not optional for aurora photography. The aurora spans the entire sky — often multiple horizons simultaneously — and a telephoto lens captures only a fragment of the display while compressing the perspective you need to show its scale. The ideal focal length range is 14–24mm on a full-frame camera (or the crop-sensor equivalent: 10–16mm). The Rokinon/Samyang 14mm f/2.8 is the budget standard and produces excellent results for the price. The Sony 14mm f/1.8 GM and Nikon Z 14-24mm f/2.8 S represent the high end. Wider and faster is always better — if you own an f/2.8 zoom and a faster prime, bring the prime.
Tripod and Cold-Weather Gear
A sturdy tripod is required — exposures of 5 to 15 seconds cannot be hand-held. Carbon fiber tripods outperform aluminum in cold temperatures: aluminum becomes brittle and the leg locks stiffen significantly below 0°F. A ball head with a friction-controlled pan is easier to reposition quickly when the aurora moves than a three-axis pan-tilt head. Bring a remote shutter release or use your camera’s 2-second self-timer to eliminate vibration from pressing the shutter button.
Battery performance drops dramatically in cold. A battery that shows 80% indoors may read 20% after 20 minutes at -20°F. Carry at least two spare batteries in an inner jacket pocket against your body — the warmth keeps them functional. Rotate batteries from pocket to camera regularly. Bring hand warmers and a headlamp with a red-light mode (red preserves night vision while still illuminating your controls).
Forecasting: The Apps and Sites That Matter
Aurora photography is primarily a forecasting problem. Having the right gear in the wrong place on the wrong night produces nothing. Use these resources in combination:
- UAF Geophysical Institute Aurora Forecast (gi.alaska.edu/monitors/aurora-forecast): The University of Alaska Fairbanks issues 7-day aurora forecasts with a map showing predicted visibility by latitude. This is Alaska-specific and the most useful single resource for Anchorage-area planning.
- NOAA Space Weather Prediction Center (swpc.noaa.gov): The 3-day forecast and current Kp index data. The “27-day outlook” uses solar rotation patterns to predict active periods weeks in advance.
- Space Weather app (spaceweather.com): Real-time solar wind data, Kp index, and recent aurora reports. The “aurora alerts” feature can notify you when Kp rises above a threshold you set.
- Soft Serve News: An aurora-specific notification service that alerts subscribers when geomagnetic activity increases — useful for overnight alerts when you want to be woken up if conditions improve.
The Kp Index Explained
The Kp index (0–9) measures geomagnetic activity on a global scale. Higher numbers mean more aurora, visible at lower latitudes. A practical Alaska guide:
- Kp 1–2: Aurora visible in Fairbanks (65° latitude) on clear nights, low on the horizon from Anchorage
- Kp 3–4: Good aurora in Fairbanks; visible overhead from Anchorage on clear, dark nights
- Kp 5+: Strong aurora visible throughout Alaska including Southcentral; overhead displays in Anchorage and south to the Kenai Peninsula
- Kp 7+: Major geomagnetic storm — aurora visible as far south as the lower 48 states; spectacular curtains and pillars throughout Alaska
Anchorage sits at approximately 61° latitude. A Kp of 3 or above on a clear night in a dark location will produce a visible display. A Kp of 5 or above produces the dramatic overhead curtains that photograph most dramatically.
Best Locations from Anchorage
Hatcher Pass (45 miles north, off the Palmer-Fishhook Road) is the premier dark sky location accessible from Anchorage. The pass sits above the valley light pollution, the abandoned Independence Mine and snowfields provide foreground interest, and the drive gives you options at multiple elevations. Allow 60 to 75 minutes from downtown Anchorage; conditions at 3,800 feet can be significantly colder than in the valley.
Eklutna Lake (30 miles northeast off the Glenn Highway) offers lake reflection compositions — the lake’s surface mirrors the aurora when conditions are calm, doubling the visual impact. Access is straightforward; the lake parking area is plowed in winter.
Turnagain Arm pullouts (along the Seward Highway south of Anchorage) are accessible within 30 minutes of downtown and provide mountain and water foreground elements, though Anchorage’s southward light dome is present to the north. Best for Kp 5+ events when the aurora is overhead rather than on the northern horizon.
Reflections Lake at Potters Marsh is close-in (10 minutes from downtown) and useful for quick-response outings when the Kp spikes unexpectedly, though the surrounding development limits true dark sky conditions.
45 minutes north toward Wasilla on the Parks Highway gets you significantly darker skies than Anchorage proper; pullouts along the highway provide open northern horizons for low-Kp events.
Composition and Post-Processing
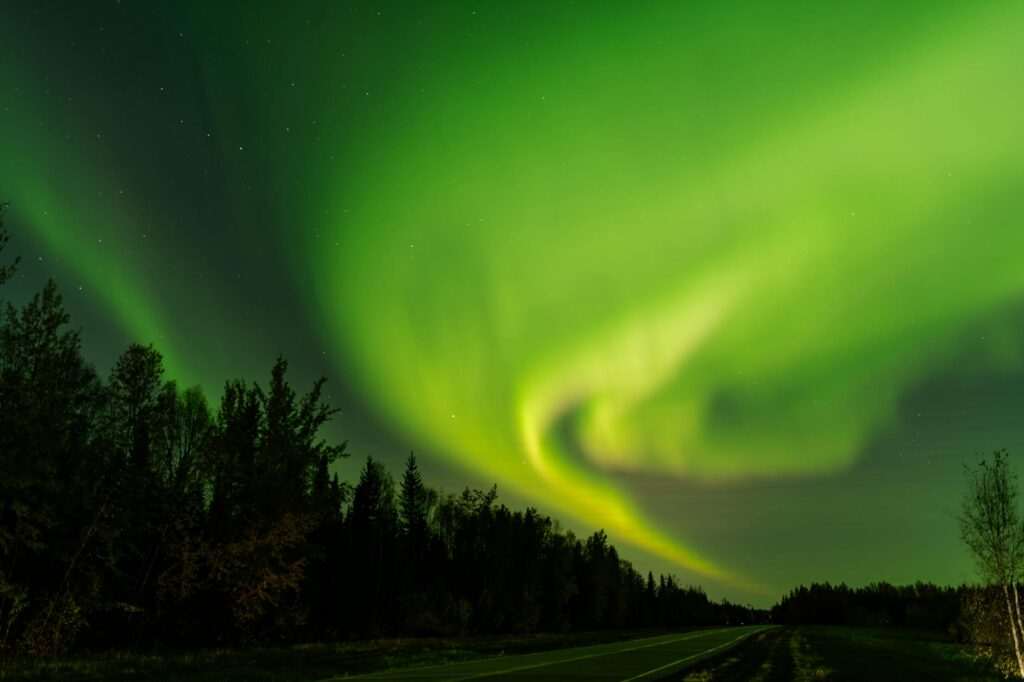
The difference between a snapshots of aurora and a photograph is foreground. A flat horizon with aurora above it is a document; a silhouetted spruce treeline, a lake reflection, a mountain ridge, or a snow-covered cabin with a lit window in front of the aurora is a photograph. Scout locations in daylight to identify foreground elements and visualize how they align with the northern sky. The aurora appears in the north (and overhead at high Kp); orient your composition accordingly.
In post-processing, RAW aurora files respond well to: slight exposure increase if underexposed, highlight reduction to recover bright cores, clarity and texture to bring out structure in the curtains, and selective color adjustment to enhance the green-magenta palette that characterizes strong displays. Noise reduction is necessary at ISO 1600+ but should be applied conservatively — over-processing destroys the fine detail in the corona structure. Lightroom, Capture One, and DarkTable all handle aurora RAW files well.
The aurora is not reliable, and that is part of what makes photographing it meaningful. You drive to Hatcher Pass in the cold, set up on the snow, and wait. Some nights nothing comes. Other nights the sky ignites from horizon to horizon and you are standing in it with a camera that is finally set correctly. Alaska gives you the best odds in North America. The rest is preparation and patience.
Featured photo by John De Leon on Pexels.


No comments yet.